Articles > Ultimate Guide to Henna Designs
Introduction:
The introduction section is a crucial part of any piece of writing as it sets the stage for what is to come. In this context, the introduction should provide an overview of the topic and its importance. It will serve as a concise summary for readers, highlighting the significance and relevance of the subject matter.
Background Information:
In order to effectively introduce the topic, it is essential to include relevant background information. This can include historical context, key events, or any other pertinent details that will help readers understand the topic better. By providing this background information, readers can gain a deeper understanding of the subject matter and its evolution over time.
The introduction serves as a roadmap for readers, guiding them through the rest of the text. It helps them establish a context and purpose for reading. By clearly and concisely stating the importance and relevance of the topic, readers will be motivated to continue reading and engage with the subsequent sections.
Overall, the introduction provides a comprehensive overview of the topic, explains its significance, and sets the stage for the rest of the piece. It acts as an essential foundation and ensures that readers are fully equipped with the necessary background information to navigate the content.
Henna art, also known as mehndi, holds significant cultural importance as a traditional form of body art. Originating in ancient India, henna art has been passed down through generations and continues to play an essential role in various cultures.
Henna art involves applying a paste made from the henna plant to create intricate designs on the skin. The paste is usually made by crushing henna leaves into a fine powder and mixing it with water or other natural ingredients. Once applied, the henna paste dyes the skin, leaving behind a beautiful red or brown stain that lasts for a few weeks.
One of the most significant aspects of henna art is its association with special occasions like weddings and festivals. In these celebrations, henna art is used to adorn the hands, feet, and other parts of the body with intricate designs. These designs symbolize joy, beauty, and auspiciousness, making henna a central element in the overall festivities.
In Punjabi culture, henna holds great importance as well. It is an integral part of weddings, where brides usually have their hands and feet adorned with intricate henna designs. The process of applying henna is seen as a symbol of love, hope, and prosperity for the new couple.
Overall, henna art carries tremendous cultural significance. It not only enhances the beauty of individuals but also serves as a form of expression, celebration, and tradition across different cultures, particularly in Punjabi culture.
Overview of the Popularity of Henna Backpieces in Modern Times:
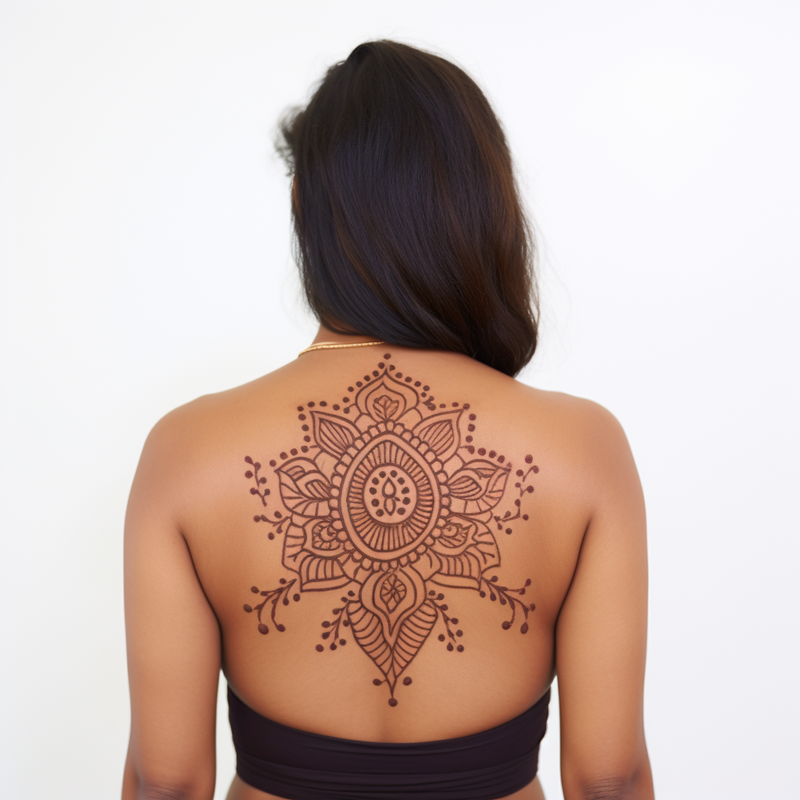
Henna backpieces, also known as temporary tattoos created with the natural dye henna, have gained immense popularity in modern times. Henna has been used for centuries in various cultures around the world as a form of body art, but its prominence has significantly increased in recent years. This rise in popularity can be attributed to multiple factors, including the growing interest in cultural diversity, the rise of social media platforms, and the appeal of non-permanent body art. Henna backpieces, with their intricate designs and temporary nature, have become a favored choice for individuals seeking unique and visually stunning body adornments. Moreover, henna tattoos allow people to experiment with different styles and designs without the long-term commitment associated with permanent tattoos. Whether it is for special occasions, festivals, or simply personal expression, the popularity of henna backpieces in modern times continues to soar, providing individuals with a temporary and fascinating way to showcase their creativity and cultural appreciation.
When it comes to choosing a design for a tattoo, there are countless options to consider. The designs can vary greatly in style, size, and complexity, allowing for a personalized and unique piece of body art. Whether you want a small, subtle design or a large, intricate one, it is essential to have a clear idea in mind.
Some specific ideas and themes for tattoo designs could include nature-inspired motifs like flowers, animals, or landscapes. Alternatively, one might consider more abstract or symbolic designs, such as geometric patterns or spiritual symbols. Popular themes also include tribal, traditional, or watercolor designs.
Regarding the intended parts of the body, the options are wide-ranging. Some common areas for tattoos include the forearm, upper arm, shoulder, back, chest, calf, and ankle. Each part offers its own canvas, allowing for different sizing possibilities and levels of visibility.
Ultimately, the choice of design and body placement is personal and should reflect one's individual taste and preferences. It is important to carefully think through the design and its potential placement, considering factors such as visibility, potential implications for professional or social situations, and whether the design complements the body's shape and contours.
In conclusion, when choosing a tattoo design, it is crucial to have specific ideas or themes in mind that resonate with personal interests and preferences. Additionally, considering the intended body part will help determine the appropriate size and visibility. With countless design options available, one can create a unique and meaningful piece of body art that truly reflects their individuality.
When researching different henna backpiece designs, one cannot ignore their significance in various cultures such as the Arabian peninsula, India, and South East Asia. In Arabian culture, henna backpieces hold deep cultural and religious meaning. These designs often feature intricate patterns such as geometric shapes and floral motifs, symbolizing fertility, good luck, and protection against evil spirits.
In Indian culture, henna backpieces are an essential part of celebrations and rituals, especially weddings. The designs often include peacock motifs, lotus flowers, and other symbols representing love, harmony, and new beginnings. Henna backpieces are seen as a way to adorn and beautify the body for special occasions.
In South East Asian culture, henna backpiece designs differ based on the specific country or region. In countries like Malaysia and Indonesia, floral patterns are common, representing beauty and femininity. In Thailand, on the other hand, henna backpieces may feature more intricate and complex designs, showcasing the wearer's social status.
Overall, henna backpiece designs in these cultures reflect their traditions, customs, and beliefs. They are symbols of beauty, love, fertility, protection, and social status. Understanding the significance of these designs helps to appreciate the rich cultural heritage behind them and the artistry involved in creating them.
Introduction:
Customizing a design to suit your personal style and preferences allows you to add a unique touch to your surroundings. Whether it's your home, office, or any other space, customizing a design allows you to infuse your personality and create an environment that truly represents you. With the ability to select materials, colors, patterns, and various other design elements, customization offers a world of possibilities. It allows you to create a space that not only looks visually appealing but also feels comfortable and welcoming. In this article, we will explore the process of customizing a design and the various aspects to consider while doing so. From selecting the right colors to incorporating personal mementos, we will delve into how customization can transform any space into a reflection of your style and preferences. Whether you have a specific theme in mind or want to experiment with different elements, customizing a design offers endless opportunities for creativity and self-expression. So, let's explore the art of customizing design and how it can make your space truly one-of-a-kind.
To ensure a successful adventure, gathering supplies is essential. Start with food and water provisions to sustain oneself throughout the trip. Pack non-perishable food items like energy bars, dehydrated meals, and nuts. Carry an ample supply of water in a reusable water bottle or hydration bladder to stay hydrated.
Choosing appropriate clothing and footwear is crucial for comfort and safety. Depending on the activity, pack waterproof or insulated clothing, layers for varying temperatures, sturdy hiking boots or shoes, and moisture-wicking socks. Don't forget essential accessories like sun hats, sunglasses, and gloves.
The necessary equipment or tools will vary depending on the specific endeavor. Common items might include a backpack, tent or sleeping bag, cooking utensils, a first aid kit, and a multi-tool. Research and assess the requirements of the activity to ensure you have the right gear.
Additional items like maps or navigation devices are vital for maintaining direction and safety. Carry printed maps, a compass, or invest in a reliable GPS device. Communication devices, like cell phones or two-way radios, are also beneficial in case of emergencies.
In summary, when gathering supplies for any activity, remember to pack food and water provisions, appropriate clothing and footwear, necessary equipment or tools, and additional items specific to the adventure. Adequate preparation and attention to detail will ensure a smooth and enjoyable experience.
To create a stunning henna backpiece, you will need a few necessary supplies. These supplies are essential for designing temporary henna patterns that leave a beautiful and intricate mark on your skin. Let's take a look at what you'll need:
1. Henna Paste: The star of the show, henna paste is the main ingredient for creating your backpiece. Ensure you have high-quality henna paste that is fresh and has a smooth consistency.
2. Plastic Cones or Applicator Bottles: These tools are crucial for precision and control while applying henna. If you prefer a freehand approach, plastic cones are your best bet. Applicator bottles, on the other hand, are perfect for creating intricate designs with greater ease.
3. Lemon Juice or Water: Lemon juice or water is necessary to mix with the henna powder to create a smooth paste. Lemon juice is often preferred as it helps enhance the color and longevity of the henna design.
4. Sugar: Adding sugar to the henna paste helps it adhere better to your skin, allowing the design to last longer. It also aids in intensifying the color payoff.
5. Essential Oils: Essential oils such as eucalyptus, lavender, or tea tree oil are used to enrich the henna paste, making it more fragrant and improving its stain-release properties.
By gathering these necessary supplies, you'll be well-equipped to create a mesmerizing henna backpiece that showcases your creativity and enhances your beauty. So, express yourself through the art of henna and adorn your back with temporary designs that leave a lasting impression.
Introduction:
When it comes to selecting high-quality henna paste and applicators, there are a few important factors to consider. Henna, a natural dye derived from the henna plant, has been used for centuries to create beautiful body art in various cultures around the world. However, not all henna products are created equal, and choosing the right paste and applicators is key to achieving a successful and long-lasting design. In this article, we will explore some tips and guidelines to help you make informed decisions when it comes to selecting high-quality henna paste and applicators. Whether you are a beginner or an experienced henna artist, these tips will assist you in enhancing your henna experience and ensuring stunning results.
Preparing your skin for a henna application is crucial to ensuring a beautiful and long-lasting result. Below are the steps you should follow to prepare your skin:
1. Washing: Begin by thoroughly washing the area of skin where you intend to apply the henna design. Use a gentle soap or cleanser to remove any oils, dirt, or sweat. This will help the henna paste adhere better to your skin.
2. Oils/Creams: After washing your skin, make sure to avoid applying any oils or creams. These can create a barrier between the henna paste and your skin, preventing proper staining. It is essential to have clean, oil-free skin for the henna to work effectively.
3. Loose Clothing: When preparing for a henna application, it is advisable to wear loose clothing that exposes the desired area. This is important as henna takes time to dry, and tight clothing can smudge the design or cause the paste to rub off. Opt for loose sleeves, shorts, or open-toe shoes, depending on the area where you want the henna design.
4. Comfortable Location: Find a comfortable location to sit during the henna application process. Since henna paste needs time to dry, you will need to sit still for an extended period. Choose a comfortable chair or cushion and ensure you have enough space to relax during the application. This will make the experience more enjoyable and prevent any unwanted smudging or discomfort.
5. Good Lighting: Lastly, ensure that you have good lighting in your chosen location. Adequate lighting is necessary for the henna artist to see clearly while applying the design. Natural daylight or bright indoor lights are ideal as they provide better visibility and allow for precise application.
By following these steps to prepare your skin for a henna application, you can ensure a successful and satisfying experience with beautiful, long-lasting results.
Cleansing and exfoliating your skin before applying henna is crucial for achieving the best results and ensuring long-lasting, vibrant color. Clean skin is essential for henna to adhere properly to the skin and allow the dye to penetrate deeply. Additionally, exfoliating helps to remove dead skin cells and unclog pores, ensuring maximum absorption of the henna pigment.
To begin, make sure your skin is clean and free from any oils or creams. Oil can create a barrier between the henna and your skin, preventing it from fully developing its color. Gently cleanse your skin using a mild, oil-free cleanser and lukewarm water. Pat dry with a clean towel.
Next, it's time to exfoliate. Take a natural exfoliating scrub or prepare a homemade mixture using ingredients like sugar or coffee grounds, mixed with a little water or oil-free moisturizer. Gently rub the scrub onto your skin in circular motions, paying extra attention to rough areas like elbows, knees, and heels. This will help remove any dead skin cells and reveal a fresh layer of skin.
After thoroughly exfoliating, rinse your skin with lukewarm water to remove any residue from the scrub. Pat dry with a towel, ensuring your skin is completely dry before proceeding with henna application.
Following these steps will provide a clean canvas for the henna to work its magic. Remember to read and follow the specific instructions on your henna product for the best results. Enjoy your beautifully henna-adorned skin!
Introduction: Henna is a natural dye derived from the leaves of the henna plant and has been used for centuries to create intricate designs on the skin. To ensure a vibrant and long-lasting henna stain, it is important to take proper care of the applied design. One crucial aspect of maintaining the henna's stain is avoiding lotions or oils that could potentially affect its color and longevity. In this article, we will explore why it is essential to steer clear of lotions and oils after getting henna, and some alternative approaches to nourish and protect the henna design without compromising its beauty.
Applying henna is a beautiful art form that involves decorating the skin with intricate designs. Follow these step-by-step instructions to ensure a successful henna application:
1. Prepare: Start by gathering all the necessary materials, including henna paste, plastic cones or applicator bottles, tissue paper, cotton swabs, and lemon juice. Make sure your skin is clean, dry, and free of any oils or lotions.
2. Choose a location: Find a comfortable location with good lighting. It's essential to have enough space to move around and hold your hand steady during the application process.
3. Wear loose clothing: To avoid smudging the henna design, it's important to wear loose-fitting clothing that won't rub against the fresh henna paste. Choose a garment that allows easy access to the area of the body you want to decorate.
4. Test the henna: Before applying the henna to your skin, test it on a small area to ensure it's the desired color and consistency. Adjust the paste's thickness by adding more lemon juice or henna powder if needed.
5. Start applying: Load the henna paste into a plastic cone or applicator bottle. Begin by holding the cone at a 45-degree angle and gently press on it to release the henna. Apply steady pressure to create smooth lines and avoid shaking or jerking movements.
6. Create the design: Use the cone or bottle to create intricate patterns, swirls, and dots on the desired area. Take your time and be patient to achieve the desired design.
7. Let it dry: Once the henna design is complete, allow it to dry for at least 2-3 hours. Avoid touching or smudging the paste during this time.
8. Remove excess paste: After the henna is completely dry, gently rub off any excess paste with tissue paper or your fingers. Avoid washing the area for the next 24 hours to allow the henna to develop its color.
By following these step-by-step instructions, you can successfully apply henna and enjoy the beautiful, temporary body art it provides. Remember to take precautions for clean and oil-free skin, wear loose clothing, choose a comfortable location, and expose the desired area of the body for the best results.
When applying henna on your back, there are several techniques that can help achieve an even and beautiful design. The cleanliness of your skin, wearing loose fitting clothing, and adequate lighting are key factors to consider.
Firstly, ensure that your back is properly cleansed and free of any dirt or oils. Wash the area with mild soap and lukewarm water, then thoroughly dry it. This will help the henna paste adhere well to your skin and prevent any unwanted smudging.
Next, choose loose fitting clothing that allows easy access to your back. This can be a loose-fitting robe or simply draping a towel around your waist. Loose clothing ensures that the henna is not disturbed while it dries, allowing for a clean and precise application.
Additionally, make sure you have good lighting in the room where you will be applying henna on your back. Natural daylight or a well-lit room will help you see the design clearly and prevent any mistakes or uneven lines.
To evenly apply henna, start from the center of your back and work your way outward. Use a cone or applicator bottle filled with henna paste to create intricate designs. Take your time and apply consistent pressure to create smooth and even lines.
Once the henna is applied, allow it to dry completely before touching or covering it. This can take anywhere from 2 to 6 hours, depending on the henna paste and the climate. Avoid smudging the design by refraining from leaning against anything or wearing tight clothing.
By following these techniques, you can achieve a beautifully even henna design on your back. Remember to maintain clean skin, wear loose clothing, and ensure proper lighting for the best results.
To achieve clean lines and intricate details in henna tattooing, it is important to follow certain techniques and methods that have been traditionally used in the Arabian Peninsula, India, and South East Asia. These regions have a rich history of henna tattooing, and their methods can be easily adapted to achieve beautiful and precise designs.
Firstly, practicing steady hand movements is crucial. Holding the henna cone or applicator at a 45-degree angle and using the fingers and wrist to create smooth and even lines can help in achieving clean and precise designs. It is also important to maintain a relaxed and comfortable grip on the applicator to ensure better control.
Secondly, using the right consistency of henna paste is essential. The paste should have a smooth and creamy texture, similar to toothpaste, that can easily flow through the applicator and create clean lines. Ensuring that the henna paste is not too thick or too watery will help in achieving intricate details without any smudging or bleeding.
Additionally, allowing sufficient drying time is crucial for clean lines. After applying the henna, it is recommended to wait for at least 4-6 hours before removing the dried paste. This will allow the color to develop and the henna to firmly adhere to the skin, resulting in sharper and more defined lines.
Lastly, using various tools like fine-tipped applicators and stencils can assist in creating intricate designs. Fine-tipped applicators allow for precise control and help in achieving delicate patterns and detailed work. Stencils can be used as a guide to create symmetrical designs and complex motifs by simply tracing the outline and then filling it in with henna.
In conclusion, achieving clean lines and intricate details in henna tattooing requires practicing steady hand movements, using the right consistency of henna paste, allowing sufficient drying time, and making use of tools like fine-tipped applicators and stencils. By following these tips and referencing traditional techniques, one can create stunning henna designs that showcase the beauty and intricacy of this ancient art form.
 Author: Sebby Says